Thursday, 31 March 2011

Brandy Bananas

Dessert posts are like buses... none for the whole blog and then two come along at once! The SO and I went for a run this evening so we were extra-hungry after our leftover guinea fowl. So I sliced a couple of (Fairtrade) bananas lengthwise, and improvised along the theme of yesterday's dessert, but this time with alcohol and fire, which of course only make things even better. The first time we set fire to the pan we had a magnificent fireball and I nearly lost my eyebrows; I ran to get my camera and we repeated the experiment. (Apologies for the focus being out; I forgot to reset it). The second fireball, while safer, was not quite as impressive. In either case... be careful at the flambé stage!

Ingredients:
  • two ripe Fairtrade bananas
  • a thin slice of butter
  • 1 tsp demerara sugar
  • a shot or two of strong rum or brandy

Peel and slice the bananas lengthwise. Drop the butter into a heavy-based (not non-stick) pan and melt over a moderate heat. When it begins to froth, add the bananas flat-side down and sprinkle over the sugar. Cook for 2-3 minutes until the flat sides have caramelised, then turn over.

Pour the brandy into a cap or shot glass. Light a long match and get it burning. In a swift movement, pour the brandy into the pan, stand back, and hold the match just over the pan. If it was suitably hot, you'll get a nice fireball! If it was a little cool, the brandy will burn in the pan; either is fine. Immediately remove from the heat and serve over vanilla ice cream or yoghurt. If your timing is good, and you use plenty of brandy, you have every chance of serving this to guests while it's still on fire. Shiny!

Wednesday, 30 March 2011

Honey-glazed Pears

Dinner tonight was a simple affair of sweet smoked mackerel from the fishmonger, cauliflower salad, and a rough aioli made from a small minced clove of garlic, a few tbsp of mayonnaise and a handful of finely-chopped dill. We also put together a pumpkin lasagne for later in the week, but I'll post that tomorrow!

For dessert tonight, I finally got around to using up a couple of conference pears; I had put them in the fridge as a last-ditch attempt to keep them from decomposing after they ripened spontaneously a few days ago. Luckily they were salvageable and after a quick trip in the frying pan they toasted up beautifully.

Ingredients:

  • Two ripe conference pears
  • a thin slice of butter
  • 1 tbsp of runny honey
  • ground cinnamon

Peel and core the pears, and slice them into long finger-sized pieces. Melt the butter in a heavy-based non-stick pan over a medium heat; when it begins to froth, add the pears. Sautee each side gently for a few minutes, until the edges are golden and caramelised. Turn the heat off, and drizzle the honey into the pan. Sprinkle with the barest tough of ground cinnamon. Serve over vanilla or natural yoghurt, or with a dollop of crème fraîche.

Pot-roast Pheasant

This is my basic recipe for pot-roasting pheasants; as the hunting season is out at the moment, I used a guinea fowl instead. A crown of duck would also work, or several quail, or of course a small chicken. The method is most useful for small or gamy birds without a thick layer of fat; if roasted, the little birds tend to become dry and tough, while in a pot-roast all the delicious juices are locked in.

I say this is my basic recipe because it is warming and comforting but not especially challenging, either in difficulty or in flavour. I have run excellent experiments with stronger flavours, such as blood orange and anise, or soy and pomegranate molasses, but this recipe is more of a gentle English pot-roast, to be served with a big pile of fluffy mashed potatoes, perhaps adulterated with a little celeriac or parsnip and a dollop of crème fraîche.

Ingredients:
  • A brace of (i.e. two) pheasants
  • a white onion or leek
  • 4 long, fat stems of celery
  • a good glass of white wine
  • 100g puy or lentilles vertes
  • a handful of parsley
  • 3 bay leaves

Remove any stray feathers or string from your pheasants and check the giblets have been removed. Heat a scant tbsp of oil in a deep oven-proof casserole and fry the birds on each side over a moderate heat, until the skin turns golden and the meat sears. Remove to a plate. Turn the heat down, roughly chop the onion or leek and add to the pan, with a little more oil if needed. Chop the celery into short lengths and add these to the pan once the onions are soft.

After the vegetables have cooked a little in their own juices, throw in the parsley and bay leaves, then deglaze the pan with the glass of wine. When all the alcohol has evaporated, add in the lentils. Place the pheasants back in the pan, breast-side down, and tip in any escaping juices. Pour over a litre of hot stock or boiling water, or enough to cover the vegetables generously and come up at least halfway on the birds.

Cover with a tight-fitting lid and either simmer on the hob or cook in a 170 C oven for 35 minutes. Uncover, turn over the birds so the breasts are up, and return for 20 further minutes uncovered, or until the legs pull easily away from the birds. Remove the birds and rest a few minutes before jointing into pieces to serve. If you have too much liquid in the pan then it can bubble uncovered on the hob to reduce. Taste and season; it will probably require salt, which cannot be added earlier as it would prevent the lentils from cooking properly. Enjoy the pheasant in deep bowls with mash and the accompanying vegetables and gravy.

Monday, 28 March 2011

Broad Bean and Pea Salad

A warm and zesty salad, and a delicious way to use broad beans, which tend to glut in the spring. We peeled ours after cooking tonight, as they seemed to have more bitter skins than usual. But sometimes the skins are thin and delicate so you can leave them on. Otherwise, peeling them doesn't take too much time: just use your thumbnail to nick a small hole in the end opposite the black sprout line, and squeeze the cooked bean out.

Ingredients:

  • 200g broad beans, unpodded weight
  • 100g petit pois (frozen is fine)
  • 1 generous handful of mint leaves
  • juice of half a lemon or a whole lime
  • 1 tsp demerara sugar
  • good olive oil

Pod the broad beans, bring a small pan of unsalted water to a moderate boil, and drop in the broad beans. If you have a lot of different sizes, try to give the largest an extra minute or two of cooking time by dropping them in first. Cook for 7-8 minutes, until tender. Just before they're done, you can drop in the frozen peas and bring back to a boil, then drain. Run under cold water, especially if you intend to peel the broad beans.

Toss the beans and peas with the rest of the ingredients and serve warm. Tonight it went well with lamb burgers and apricot cous-cous, before we got down to the serious arts and crafts of wedding invitations..!

Lamb Burgers with Apricot Cous-Cous

Lamb and cous-cous, always a delicious combination! Especially on these slightly chilly spring evenings, when you've been warm all day but as the evening draws in, you definitely still want a hot meal. The lamb is from the market butcher and as I only bought it yesterday, I decide to cook it in burgers, thick and rare in the middle. A little spice and garlic in the patties, some sweet cous-cous, and a warm green salad are a perfect closing note for a delightful weekend.

Ingredients:

  • 300g lean minced lamb (preferably from within your own country!)
  • 1 tsp ground cumin
  • 1 tsp ground coriander
  • 1 tsp paprika
  • 1/2 tsp cayenne pepper
  • 1 medium clove of garlic
  • 1 egg
  • A handful of fine breadcrumbs
  • dried cous-cous
  • a few dried apricots
  • a small handful of almonds
  • a thin slice of butter
  • 1/2 tsp of vegetable bouillon

In a mixing bowl, combine the lamb, spices, egg and breadcrumbs, and grate over a good seasoning of black pepper. Mix thoroughly and shape into four 3/4" thick patties. If you prefer your meat cooked to well done, make them half as thick. Fry in a heavy-based non-stick frying pan, to which you should add a barest trickle of oil to stop them sticking at the start. They'll need about 4 minutes per side, or until seared and brown.

Roughly chop the almonds and dried apricots; add the latter to a pyrex bowl with enough cous-cous: it will double in size when cooking, and only you know how hungry you are! Pour boiling water over the cous-cous in a 2:1 ratio and stir in the slice of butter and bouillon. Microwave, covered with a small plate, for two minutes, then leave to the side until needed; the grains will absorb any remaining water and it can be fluffed up at the end with a fork, at which point you should stir in the chopped almonds.

Tonight we served this with a couple of pita breads and a broad bean & pea salad; some yoghurt, hummus or tzatziki would also go beautifully alongside.

Sunday, 27 March 2011

Cabbage with Juniper Cream

Another Nigel Slater tweak, this time a side turned into a main course. This is absolutely delicious and I encourage you to try it, even if you're not usually a fan of cabbage. The key is to cook the cabbage as minimally as possible, so that it retains bite and flavour, rather than degenerating into a sock-smelling mess. And use a big hearty cabbage like Savoy, not an insipid white ball from the supermarket. This is the vegetarian version, but you could easily snip in some grilled bacon or serve with a seared duck or pigeon breast.

Ingredients:

  • 350g cabbage
  • 2 tsp black peppercorns
  • 2 tsp juniper berries
  • a thick slice of butter
  • 1/2 tsp salt
  • 200ml crème fraîche or double cream

Set off any brown rice or other accompaniment cooking; the cabbage takes less than 10 minutes to prepare. Separate and wash the leaves of the cabbage, pile them on top of each other, then slice into finger-width slices with a big, sharp knife. Bring a large pan of water to a boil, salt it lightly, then cook the cabbage for 2-3 minutes; essentially as soon as the water is back to a rolling boil, you should be testing the stems for done-ness. Drain in a colander and return the pan to a low heat.

Pound the peppercorns in a mortar and pestle, then drop in the juniper berries and crush them lightly. Drop the slice of butter into the warm pan, allow it to melt, then drop in the spices and sautee them for a couple of minutes, until fragrant. Pour in the salt and cream, stir around so it doesn't separate, and heat through. Return the cabbage to the pan and bring everything back to piping hot, then immediately serve. Tonight we toasted pumpkin seeds to top and served with plain fluffy mashed potato.

Saturday, 26 March 2011

Lamb 'Abritzi'

My dad introduced me to this dish a few years ago, and I've absolutely loved it since. I hadn't experimented much with lamb, as it seemed to me you could only eat it after hours of cooking, or in tiny morsels from a quickly-grilled chop. But this dish was a revelation! I've spelled the name the way my dad says it, but I suspect that it's from the Abruzzo region of Italy; however the only lamb dishes I could find from that region were the aforementioned slow-cooking stews. This is anything but! It's very fast, and the lemony garnish contrasts beautifully with the earthy rare lamb.

Ingredients:

  • 300g of fillet or boneless rump of lamb
  • plain flour
  • olive oil
  • 1 large or 2 small green peppers
  • 10 green olives
  • one lemon

Slice the lamb into wide strips about 5 mm thick: about as thinly as you can without making any holes in the meat. Toss the pieces around in plain flour until they are thoroughly coated, and shake off the excess. Heat a heavy-based non-stick pan to a moderately high heat, and add some olive oil. When it shimmers, but before it smokes, add a few pieces of lamb. Cook until golden and sealed on one side (slightly less than 1 minute) then flip and cook on the other side for half the time. Cook in batches, shaking off excess oil and setting on a plate without kitchen paper.

Meanwhile, roughly dice the green pepper and quarter the green olives, lengthwise. Juice the lemon into a small bowl. When the lamb is done, wipe out the pan with kitchen paper and add a little olive oil to the pan. Gently sautee the chopped pepper for about five minutes, until slightly softened and a little caramelised around the edges. Return the lamb and any juices (which should be pinkish-red, not clear) to the pan, and add the lemon juice and olives. Turn the heat off and allow to heat through, giving a good grating of black pepper and a little salt. Toss and serve with crusty bread or brown rice.

Thursday, 24 March 2011

Trout with Honeyed Almonds

The SO is finally back from the US, so I took the day off to catch up - we missed our 9th anniversary together by two days so this was lovely recompense. We wandered into town on an amazingly warm spring day, enjoying the sun in sandals and shirtsleeves. From the as-always excellent market, we picked up enough food for the next few days, including two trout from the fishmonger, a rare treat for a midweek supper. They were so fresh they looked almost alive, and when washing them it felt like they were trying to jump out of our hands!

Almonds are a classic accompaniment to trout; here I add a couple of extra ingredients which I recalled went well in the past. Don't neglect the basil; it really does add another dimension of flavour. This would work well served with pasta with a little crème fraîche, or wild rice, or even just a crusty loaf of bread. But after the sun went down, the day became a little cooler, and we decided to split a baked potato to keep ourselves warm. Any greens will do but we used the last of the chard, cooked for minutes in its own juices and pillow-soft.

Ingredients:
  • Two whole trout, heads and tail-fins removed if desired
  • 1 tbsp olive oil
  • 2 thin slices of butter
  • plain flour
  • 100g flaked almonds
  • 2 tbsp honey
  • juice of half a lemon
  • a medium bunch of basil, stalks removed

Clean the trout thoroughly, then dip it in a tray of plain flour and shake off the excess. Heat one of the slices of butter and the tbsp of olive oil in a heavy-based non-stick frying pan, stirring to combine them as the butter melts. When the butter is just popping, lay the two trout in the pan. Fry over a gentle heat for 7 minutes per side, or until the flesh is cooked and falling off the bone.

When the trout are done, place on plates with your accompaniments. Wipe out the non-stick pan with kitchen roll, then drop in the other slice of butter. When this has melted, add the almonds and sautee until they are golden-brown. Meanwhile, combine the honey and lemon juice throughly in a bowl. Pout this mixture over the almonds and switch the heat off. Throw in the basil leaves and stir, allowing the liquid to reduce by about a third. Then pour over the trout, and serve immediately. A glass of white wine would not go amiss :)

Watercress Soup

This makes an excellent starter, which is how I serve it tonight. It might be difficult to bulk this out to a full meal, so just serve first and enjoy. Even if you don't like watercress raw, this is a delicious soup; the spiciness of the cress dims immediately on cooking, leaving an earthy, savoury yet springlike taste.

Ingredients:
  • 1 small onion
  • 1 small potato
  • 300ml hot stock (bouillon is fine)
  • 1 bunch of watercress

Finely chop the onion and sweat in olive oil or butter over a low heat for 8 minutes, until transparent. Meanwhile, finely cube the potato, then add to the pan and allow to colour, stirring every so often so it doesn't stick. It's fine if a layer of golden starch builds up on the bottom of the pan, just don't let anything burn.

Pour in the hot stock and scrape the pan to deglaze it, then cover and simmer. Meanwhile, shred the watercress - Delia likes to use only the leaves, but I have found no problem including the stalks, if shredded finely. When the potatoes are just tender, add the watercress, stir once, replace the lid, and continue to simmer for 2-3 minutes until the leaves have wilted and the colour of the stalks has brightened.

Remove from the heat and blend thoroughly using an electric blender. Remove any stringy bits if they refuse to blend. Serve with a dollop of crème fraîche and a grating of black pepper.

Wednesday, 23 March 2011

Pork Chop with Cauliflower Salad

I know, crazy combination right? But the caulis looked so cheerful in the market: nestled in a crate with cheeky white florets poking out from within a cocoon of emerald green leaves. I always preferred broccoli or carrots as a child, but with the right seasonings, the slightly nuttier flavour of cauliflower can be delicious. It's just important not to overcook it!

As for the pork chop, I ended up with a huge thick slab from the butcher, and it has kept quite well for a few days. I like to flour and fry it, but grilling a monster like this would also be fine as it would probably stay quite juicy. No marinade, no spices, just seasoned flour and a slow caramelisation in the pan. The juices ran all over the plate with the salad dressing, and one could certainly use some soft white bread to mop them up.

Ingredients:
  • a small handful of raisins
  • 1 tsp caraway seeds
  • 1/2 tsp cumin seeds
  • a good handful of cashew nuts
  • 5-6 florets of cauliflower, and a few of the small leaves if desired
  • a handful of peppery salad leaves (I like watercress) or flat-leaf parsley, finely chopped
  • One large pork chop
  • a few tsp plain flour
  • juice of half a lemon
  • a splosh of really good olive oil

First, put the raisins in a pyrex bowl and pour a small amount of boiling water over them, and leave them to soak. Dry-fry the seeds in a non-stick frying pan until they are hot and smelling fragrant, then tip them into a mortar and pestle and gently crush a little. Dry fry the cashew nuts, tossing around frequently on a low heat so that they don't burn, then remove from the pan.

Dip the pork chop in seasoned plain flour and fry in olive oil over a moderate to low heat. Thin cuts will need a higher temperature and less time, but the slab I was given took a good five minutes on each side before the juices no longer ran red. Don't overcook your chop: it should still have a hint of pink, and it's fine if the middle of the bone is still red, as it does not conduct heat well.

Slice the cauliflower florets into half-cm slices, maintaining their essential shape - I'm sure there is a name for this technique but neither my recalcitrant brain nor Google seem to be able to help me. Steam them for 3-4 minutes, until al dente. Drain and run a little cold water over them, and also drain the raisins. Toss together the cauliflower, leaves, spices, raisins, cashews, lemon juice and olive oil, and tip over the sizzling pork chop on your plate. Enjoy!

Portabella Bun with Taleggio

I popped into the Cambridge Cheese Company at the weekend, and bought some painfully expensive but excellent taleggio, partly inspired by the Stickybeaks supper club I attended a few weeks ago. I thought it would go very well on a couple of juicy portabella mushrooms in between some soft buns. I was right!

Two buns served me for dinner, and one would serve one person for lunch. Very hungry people might want some chips and/or salad on the side.

Ingredients:
  • 2 large portabella mushrooms (they shrink when cooked)
  • 3 tbsp balsamic vinegar
  • 1/2 tsp sugar
  • 1/2 tsp salt
  • 1/2 tsp mixed herbs
  • 1 tsp Worcestershire sauce
  • 1 garlic clove, crushed
  • 2 tbsp water or chicken stock
  • a few thick slices of taleggio
  • lettuce, tomato, or your favourite sandwich leaf
  • nice soft buns or ciabatta rolls
  • HP sauce (optional)

Combine the vinegar, sugar, salt, herbs, Worcestershire sauce, garlic and water or stock, and pour over the two mushrooms; marinade at room temperature for at least half an hour, preferably more.

Preheat the grill to a moderate heat, then grill the portabellos about 5 minutes each side: do the round sides first and finish with the gills upright, so as to capture the juices. I've tried frying them in the past, and it works ok but tends to sear the outsides before the inner meat is properly cooked.

Combine on a toasted bun with the rest of the ingredients; I know my youngest sister would then slather with HP sauce and I can't say I blame her :)

Monday, 21 March 2011

Smoked Crevettes, Sauteed Potatoes and Sharp Salad

Yet again I sing the praises of the market fishmonger, who smokes his own crevettes and sells them at five for £2. These are fat fingers of prawny goodness, and five is plenty for me. I needed something fairly quick to prepare tonight as I got back a little late after helping friends to make a giant papier-mache fish. I also had a huge craving for sauteed potatoes, which conveniently are much much faster to prepare for one person than two.

Here I offset the smoky fattiness of the prawns with sweet sauteed potatoes, and balance those against a sharp, peppery salad with a lemon-mayonnaise dressing. The combination of flavours is exquisite: one of those meals where you move rapidly from one side of the plate to another, trying the combinations and enjoying the contrast of flavours.

Ingredients:

  • 1 medium potato
  • Five fat smoked crevettes, or 150g smoked trout
  • a generous handful of watercress
  • a small handful of fluffy lettuce
  • a few leaves of fresh basil
  • a handful of spinach or chard
  • 1 ripe tomato
  • 1 tsp capers
  • juice of half a lemon
  • 1 1/2 tbsp mayonnaise
  • 1 tbsp olive oil
  • 1 tsp dijon mustard

If you have time, you can very gently boil the whole potato for 15 minutes, then allow to completely cool and slice. I was in a hurry, and find that it's much faster just to slice the raw potato into thick (~8mm) slices, layer at the bottom of a small saucepan, and just cover with water. Simmer for 10 minutes, until the surface barely begins to give.

Meanwhile, if you like, shell the crevettes; I like to leave just the tail ends on to hold them by, preserving a little, but not all, of the messy fun of eating seafood and salad together. Roughly chop the leaves and combine in a bowl or on your plate. Slice the tomato across and in halves so that the seeds stay in. Put the rest of the ingredients in a jar, grind over a good amount of black pepper, and shake to emulsify. Taste; it should be sharp and punchy.

When the potato slices are done, drain and cover again with cold water, leave for a minute and then drain, to bring their temperatures down a little. Leaving them in the cold water is fine, but be very careful when you fry them, as the water will cause the oil to spit. Speaking of which, heat a heavy-based frying pan (not necessarily non-stick, but it helps) over a moderate heat and add a few tbsp of olive oil. When it is shimmering and fragrant, carefully add a few slices of potato. If you can fry them all at once, fine, but if you're going to need to split into batches, then you might as well split them evenly between batches, and make your life less complicated!

Fry for 2-3 minutes each side, until dark golden brown. Scatter with salt while still hot and sheened in oil. When done, arrange around the salad and drizzle this with the dressing. Serve immediately - and don't burn your tongue on the amazing potatoes :)

Sunday, 20 March 2011

Squid with Angel-hair Pasta

Mmm, squid are lovely. The fishmonger in Cambridge market does a nice selection; today he had both tiny ones and enormous ones! Cooking as I am for one, I bought two small ones. They'd be very usefully-sized for stuffing and roasting, but I find that kind of food a little fussy. Here I combine them with some Italian flavours for a light and refreshing pasta dish. I think traditionally the greens would form a separate course rather than part of the dish, but I wouldn't have been able to juggle two dishes and watch the final two episodes of Being Human!

This is a meal where there's a fair bit of preparation, then the actual cooking is lightning-fast, so do have everything ready before you fry the squid.

Ingredients:

  • 2 small, 1 medium, or half a large squid per person
  • 1 red bell pepper
  • 5 sundried tomatoes in oil, or dry, rehydrated
  • 5-6 green olives
  • 2 stalks of swiss chard
  • generous handful of fresh parsley
  • 1 fat clove of garlic
  • a chunk of parmesan
  • 3 balls of dried egg vermicelli
  • juice of 1/3rd of a lemon
  • 1 handful fresh basil

Prepare the red pepper as for ruby salad: slice into halves or thirds, roast at 200 C for 35 minutes, skin side up, then remove from the oven and put in a pyrex bowl with a plate over the top, allowing to steam in its own heat for at least 20 minutes.

Meanwhile, clean the squid thoroughly, removing the skeleton and internal organs, and giving it a good wash inside and out. Detach the tentacles and body, throwing away the mid section around the eyes. As finely as you can, slice the squid body into rings, and then the tentacles into slightly larger pieces. If you have an extremely large squid, you might want to slice it into thin strips rather than rings.

Roughly chop the sundried tomatoes and reserve in a pyrex bowl. Slice the olives lengthways into fat segments and add them to the tomatoes. Slice the stalk of the chard into thin segments and add to the same bowl, reserving the billowing green leaves. Finely chop the parsley and add to the bowl.

Skin the cooked red pepper and tear into long pieces, in the bowl in which it was steaming so as to keep the smoky juices. Put the garlic in a garlic crusher, ready to crush. Likewise, put the parmesan chunk in a mouli grater, or pre-grate if you don't have one. Put the vermicelli on to boil, as per the cooking instructions. Add 1 tsp olive oil to a heavy-based non-stick frying pan and raise to a high heat. You are now prepared!

When the oil begins to shimmer, but before it begins to smoke, throw in the squid rings and toss around to colour - cook in batches if you need to, so as not to overcrowd the pan. When the squid rings are all done, remove them, turn the heat down and add a touch more olive oil if you need to. Gently fry the chard mixture for 2 minutes, until the stems have just brightened. Roughly tear the chard leaves in and add a splash of water, stirring them around until they wilt, then return the squid and peppers to the pan and heat through.

Tear the basil into the pan and squeeze over the lemon juice, and a good grind of black pepper. Immediately serve over the drained angel-hair pasta and top with grated parmesan. YUM!


Chinese Chicken and Purple Sprouting Broccoli

Another spring mainstay! When the first purple sprouts come out I love to base meals around them. They're delicious in tempura but I felt like something a bit lighter tonight. One chicken breast and a few storecupboard bits and pieces later, and you have a tasty balanced meal. Aaand I'm still cooking for one.

Ingredients:

  • 10 sprigs of purple sprouting broccoli
  • 1 chicken breast (free-range at least)
  • 3 tbsp flour
  • 3 tbsp Chinese all-spice powder, or
    • 3 tsp ground aniseed
    • 1 tsp cinnamon
    • 1 tsp ground ginger
  • 2 tbsp soy sauce
  • 1 generous tbsp runny honey
  • 1 tbsp ume plum seasoning, or 1/2 tsp white wine vinegar
  • 2 tbsp Chinese cooking wine, or normal white wine & 1/2 tsp sugar
  • 2 cloves of garlic
  • 1 small piece of ginger
  • 1 packet of noodles, prepared according to the packet

Slice the broccoli in half lengthwise, if they are thicker than about 5mm across. Pop them in a steamer pan but don't start them off yet. Combine the flour and spices in a flat dish, slice the chicken into 1cm-wide pieces and cover them in flour, shaking excess off. Finely-chop the garlic and ginger, and combine the liquids in a small ramekin.

Fry the chicken pieces in just enough vegetable oil to keep them off the base of the pan, over a moderately high heat. They will take about 40 seconds per side to cook through and go a tiny bit golden. As you cook them, remove them from the oil and drain on kitchen paper.  When you're about 3 minutes from the end of the cooking process, start the broccoli steaming.

When the chicken pieces are done, remove any excess oil and wipe the burned flour out of the pan with some kitchen towel. Add a new splash of oil and fry the garlic and ginger for 30 seconds. Drain the broccoli - they should be al dente - and toss around in the pan for a minute, then pour in the liquid ingredients. Add the cooked noodles and chicken to the pan, heat through and allow the alcohol from the wine to evaporate off. Serve with lemon wedges and/or sweet chilli sauce.

Thursday, 17 March 2011

Quick Roast Rhubarb

Mmmm, the first rhubarb is out: tiny pink stems which cook very quickly and are full of vibrant astringent juices. I make the most of this season; by the time the first English berries are out, I'm sick of rhubarb, but it's glorious when the season starts. It matches perfectly the cool bright days of spring.

Crumble is a fairly classic way of preparing rhubarb, but it is much more effort and not something I tend to whip together midweek. Roasting the rhubarb, especially these gentle first stalks, retains the flavour and texture, without weighing it down with oats, cinnamon and butter. For two people for a midweek dessert, you'll need:

Ingredients:
  • Five ~10inch-long thin stalks of rhubarb
  • 1 tbsp granulated or demerara sugar
  • Optional flavourings such as:
    • 1/2 tsp vanilla essence, or
    • 2 blood oranges, segmented, or
    • 2 star anise, lightly pounded to break apart

Top and tail the rhubarb and slice into inch-long pieces. You can divide the fat end in two if it makes the pieces evenly-sized. Put in a pyrex baking tray: do not use metal, non-stick or even ceramic, as the rhubarb will react with these materials. Sprinkle over the granulated sugar and a flavouring if desired, and add just enough water to thinly cover the bottom of the dish.

Roast at 200 C for 20 minutes or until the rhubarb gives effortlessly when poked with a fork or knife. The water will have become a pink and delicious syrup. Remove the anise if used, and serve on yoghurt, with a little more sugar or honey to taste.

The Perfect Baked Potato

I've been baking potatoes like this for years now; I'm not even sure where the original idea came from. The Guardian recently ran a piece where they tried various different cooking methods and compared the results; my method is apparently the same as the BBC's, so maybe that's where I read it first. It is as follows:

  1. Preheat the oven to 200 C;
  2. Wash the potato if needed, then dry thoroughly;
  3. De-eye;
  4. Prick all over: I use one of those little sweetcorn holders but a fork will do;
  5. Put 1/2 tsp of table or flaked salt in the palm of your non-writing hand;
  6. Pour 1tsp of vegetable oil on top of the salt;
  7. Roll the potato round and around through the oil and salt, using the tips of your writing hand;
  8. Open the oven door, pop it on the top shelf without a tray;
  9. Wash hands and come back in 1hr 15 minutes, by which point the potato will be crisp on the outside and meltingly fluffy on the inside.

I know the instructions are patronising; who could possibly forget to prick or de-eye the potato before covering it in oil, or get both hands covered in oil and finding it rather messy to open the oven door...? Well - me for starters :) I've recorded my mistakes so you don't have to repeat them!

Tonight for a topping, I flaked a large mackerel fillet into a bowl, added 1 tbsp of capers, a dollop of mayonnaise, 2 tbsp of shredded parsley, the juice of 1/3rd of a lemon, and a good grating of black pepper. I love the contrast between the cool topping and the steaming-hot potato. The above method makes a delicious crispy skin and on particularly decadent occasions, I save this until last and top with grated cheddar, making it a two-course meal!

Wednesday, 16 March 2011

Braised Shitake Mushrooms

For years I struggled with cooking shitake mushrooms. They are very different from most other varieties: unlike oyster or enoki, they are very resilient and are never in danger of breaking up while cooking. Unlike European field, chestnut or white mushrooms, they barely sweat while cooking. Undercooked shitake is unpleasant and very chewy, so I really needed a better method than just frying and hoping.

At last I found a good method, in a recipe book I hadn't used in years, simply called 'Japanese Cooking'. I recall I bought it in a Borders sale, years before they went bust...  Anyway. The technique is to braise the mushrooms: rapidly fry them over a high heat to give some caramelisation, then add flavoured liquid, cover and cook on a low heat for at least 20 minutes. Like braising sausages or chicken, this method gives them a nice smoky outer flavour, but cooks their tough proteins all the way through, leaving them soft and succulent. The liquid reduces, leaving a delicious sauce that can be varied with whatever flavours you wish to add. The recipe below serves one person, but can easily be scaled up.

Ingredients:

  • 75g sesame seeds
  • 10 fresh shitake mushrooms, or dried, rehydrated for 24 hours
  • 100ml hot water or stock (if you use bouillon, reduce the amount of soy sauce you add)
  • 2 tbsp soy sauce
  • 1 tbsp sugar

Dry-fry the sesame seeds in a non-stick, heavy-based frying pan, remove when golden, and set aside. After wiping and checking over for odd bits, slice the shitakes into thick slices, making sure to cut through the tougher stalks. (Some people remove these entirely but I think it's a bit of a waste.) Fry the mushrooms over a high heat in a little vegetable oil; they will immediately absorb it but don't be tempted to add more. They will start to hiss as the steam escapes; turn frequently for five minutes until they have taken on a golden hue.

Pour the rest of the ingredients into the pan, stir to combine, cover and immediately reduce the heat to low. Braise for 25 minutes, stirring and turning occasionally, and adding more water if the pan shows signs of going dry. Serve topped with the sesame seeds: this goes well with stir fry and salads, or you could even drop them into a broth of noodles and greens.

Grated Asian-style Salad

This is a quick, fresh salad that works at any time of year, but is particularly useful in the slow winter and early spring months before the new wave of shoots and leaves are available. The fresh herbs are really important; don't be tempted to substitute dried herbs! Our local Asian store is brilliant for last-minute purchases.

I like to use kohlrabi but I've only found it in my local market, so it might be hard to find in supermarkets. If you have trouble locating one, you could use finely shredded white cabbage or grated cucumber instead. I've scaled this to use one medium-sized kohlrabi, since they don't keep well so I tend to grate one all at once. This should serve two people generously, if you serve with some braised mushrooms or even just some dry-roasted peanuts. Plain white rice is also great as you can mop up some of the nice salad dressing.

Ingredients:

  • 1 medium kohlrabi, peeled
  • 2 carrots, scrubbed or peeled
  • 1 small bunch of radishes, with leaves if possible
  • 1 small bunch of fresh mint
  • 1 small bunch of fresh coriander
  • half of a red chilli (or more if you like it hot!)
  • 4 tbsp extra-virgin rapeseed or refined sunflower oil
  • 1 tsp toasted sesame soil
  • juice of 1-2 limes
  • 2 tsp fish sauce
  • 1 tsp soy sauce

Using a tower grater, grate the kohlrabi and carrots, holding them at an angle so that long strips are produced. Rinse the herbs if they are gritty, remove the leaves from the mint, and roughly chop. Rinse the radishes and their leaves, which tend to be very gritty. Remove the radish roots and the connection between the root and the stems. Slice the radishes into thin circles and roughly chop the leaves.

To make the dressing, finely chop the chilli, and shake with the rest of the ingredients in a jar. Taste and adjust the lime juice if needed; it should be a pleasantly sharp dressing, with a smoky umami from the fish sauce. Toss the salad ingredients thoroughly together. If you wish to keep some aside for later, do so now: it will keep undressed in an airtight container in the fridge for a day or two. When ready to serve, dress and toss thoroughly.

Tuesday, 15 March 2011

Roast Herby Lamb Chops with Tiny Tatoes

Today I adapted another Nigel Slater recipe to suit the chunky lamb chops I bought from the butcher's at the weekend. I also used it as a good excuse to pop out in the fresh spring afternoon to buy some anchovies, for a marinating herb rub. If you don't like anchovies, you could substitute strong black olives. And if you don't like those, I guess you could ... grow some taste buds!

I serve the lamb with some tiny roast potatoes tucked around the lamb. I'd usually flavour potatoes but the lamb herb rub is very strongly-flavoured so it's best to leave them plain. Also I finished off the last of the ruby salad from Saturday; a spinach salad with a splash of lemon juice would be equally delicious with this. As per usual for food this week, this serves one hungry person!

Ingredients:
  • 10 sprigs of fresh mint
  • 4 medium cloves of garlic, peeled
  • 6 anchovy fillets
  • 2 lamb chops
  • 1-2 medium potatoes
  • 1 tbsp duck fat (or vegetable oil)

Whiz the mint, garlic and anchovies in a small food blender, and grind over a good seasoning of black pepper. Cover the chops with the rub on both sides, and leave in a cool place for a couple of hours - you could do this before you go to work and cook when you get home.

Preheat the oven to 220 C. Scrub and de-eye the potatoes - I never peel them, the skins are the best bit! - then chop into 1cm cubes. Parboil for about 8 minutes, keeping an eye on them. You want to cook them until they'll fluff in the pan when you shake them, and they need to roast in the oven in about 20 minutes, so they should be slightly more done than your usual pre-roast parboil.

Put a roasting tin or pyrex tray in the oven with the dollop of duck fat. Drain the potatoes and shake in their pan to give a good fluffiness. Tip into the tray and toss with a spatula to get a good coating of fat. Nestle the lamb chops in amongst the potatoes, trying to give everything enough space to breathe. Roast for 20 minutes; the rub will soften, the lamb will become tender and pink, and the potatoes will crisp around the edges.

Sunday, 13 March 2011

Ruby Salad

We started making this in Christmas 2009, in which we basically cooked and ate everything from Nigella Lawson's Christmas book. It's a little fiddly for a weekday; unless you are working from home and want a little break, or have someone very patient to do the pomegranate while you prepare everything else, I recommend doing this only on special occasions or during a relaxing weekend. But it's well worth all the time and effort, and I always end up making too much... this definitely serves two as a side, since I aimed to make enough for one and had one portion left over.

Ingredients:

Preheat the oven to 200C. Slice the peppers in half and deseed. Place in a small baking dish: you want them all to have their own space but not lie so far apart that they dry out and burn. Toss with a little olive oil and cook for 25 minutes, or until the edges just begin to go black. Bell peppers may take a little longer than pointed peppers. Remove and place immediately in a pyrex bowl and cover with a plate, or seal in a small freezer bag. Leave for a good hour to steam in their own heat; this will make the skins come loose. You really want to do this quite a long time before you want to eat, otherwise you'll be tempted to leave them too short a time and the skin won't come off properly.

Meanwhile, deseed the pomegranate. I usually slice the fruit into quarters and pop the seeds out by hand in a very large plastic tub, using water to separate the seeds from pith and skin if the latter is clingy. My family has reported some success with Jamie Oliver's whacking method. Personally I find it totally ineffective, while also mushing half of the seeds to pulp, but each to their own!

Skin and thickly slice the peppers. Combine the peppers, pomegranate seeds, capers and dress with the lime and olive oil. Serve!

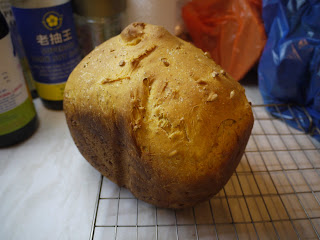
Pumpkin Bread

The saga of the Crown Prince continues! I could have made something I'd already tried but NO! It's time to make something new! I did adapt this from the very helpful Breadmaker Bible; it's a really nice guide if you're making bread for the first time and even covers sourdough. However I disagree with her on using instant fast-action yeast in everything; I find reactivating normal dried yeast gives a better result. Also, you can see if it's still working - the fast-action stuff can go 'off' and your loaf comes out a brick, whereas you know if your reactivated yeast has given up the ghost before you risk any ingredients.

The original recipe uses sweet potato but of course here I use up some more pumpkin. I found it easier to chop and steam the remaining 1kg of pumpkin I had lying around, and then mash 200g of it, than to try to cut out and cook just 200g worth. I nearly pre-toasted the sunflower seeds but you shouldn't: plenty will protrude from the finished crust and these will pick up a nice golden colour anyway. I was also surprised to add them at the start and not on the beep, since some seeds and nuts can be broken up by the bread-maker and put too much oil into the dough, but this didn't happen with the sunflower seeds. As usual, if you don't have a breadmaker, you can do the kneading yourself, rise, knock back, rise again and bake in an oven for 45 minutes at 180C.

Ingredients:

  • 50ml boiling water
  • 1 tsp granulated sugar
  • 70ml cold water
  • 1 tbsp dried yeast: I use Allinson Dried Active Yeast; comes in a 125g yellow tin
  • 2 tbsp vegetable oil
  • 2 tbsp mild runny honey
  • 200g mashed pumpkin
  • 50g sunflower seeds
  • 1/2 tsp (preferably freshly) grated nutmeg
  • 1/2 tsp freshly ground black pepper
  • 1/2 tsp ground ginger
  • 50g wholemeal bread flour
  • 370g strong white bread flour

Put the boiling water in a small pyrex bowl and dissolve in the teaspoon of sugar. Add the cold water and then stir in the tablespoon of dried yeast. Leave for 10 minutes; it should produce a frothy head and smell sour and yeasty. If it doesn't, go buy some new yeast!

Put the yeasty water in the bottom of the breadmaker, followed by the rest of the ingredients. Set it to basic white 2lb option. Remove promptly and cool right-side-up on a wire rack. Allow to settle for at least 10 minutes before cutting.

Scallops with Chorizo

I've not had a moment to write this week, but then I haven't been cooking much: the SO is off at a conference so I spent a few days just eating up leftovers we had in the fridge. Wednesday, the night before he left, we went to a 'supper club' at the new independent cafe in Cambridge, Stickybeaks. A colleague from work invited me, and we had a lovely time: I highly recommend it to anyone in the Cambridge area. The format was perfect: fifteen people entered in dribs and drabs, took seats and glasses of wine and introduced themselves. When everyone was seated, we were given a little introduction to the meal plan of the evening: a very delightful Italian menu.

Then we watched as the major steps of preparation were performed for the starter and main meal: butternut squash risotto with taleggio, and Italian-sausage stuffed bomb courgettes. After we finished these - delicious! - we watched Lucy and Catherine prepare the fastest cake in the world. They put that in the oven, and then we were treated to Blue-Peter-style slices they'd cut minutes before. The cake was rich and wonderful, and I would have loved a strong cup of coffee and a little chaser - but it was a school night. At last I know where childless 30-40-somethings spend their time!

Thursday and Friday I have nothing to report - leftover pancakes, leftover gumbo. Today was different! Having at last cleaned the fridge of the last vestiges of last week, I set out to the market for this week's shop. I made sure to buy only half as much food as usual by bringing only half the normal-size bag. Otherwise I'm totally helpless when surrounded by all the fresh produce. It was a beautiful spring day and I was glad to be out. I did miss the SO though - especially when standing vacantly in the veg stall having my groceries weighed, taking a minute to realise that without my usual pack mule, I'd need to pack and carry the backpack myself!

Sometimes people say that it's hard to cook for one. I mostly agree with this sentiment - it's certainly hard to start cooking for one. You look at the empty kitchen, you think 'well, I'm not that hungry', then you eat beans on toast and feel depressed. I like to think about it differently. I like to look at that kitchen and see a place to experiment, time to try something I haven't tried before. If I mess it up... well, there's always beans on toast!

Tonight I cooked scallops for the first time, and they went rather well. I couldn't resist using chorizo as the main addition as I find the smoky-sour flavour is just so perfect with seafood. The accompaniments were a salad that's become a staple in our family since we first made it a few Christmases ago, and some pumpkin bread I invented today. Scallops were not nearly as intimidating as I thought. The same rules apply to them as to almost any seafood: buy fresh, cook on the day, don't overcook, and serve immediately. And of course, enjoy eating more of them than you'd ever get in a restaurant, for a much lower price!

Ingredients:

  • 6 scallops per person, or 2 for a starter (with or without coral is fine)
  • Two 5mm slices of chorizo per person, or 0.5 for a starter
  • 3 large lettuce leaves per person, or 1 for a starter (NOT iceberg)
  • vegetable oil
  • balsamic vinegar
  • very good olive oil

Wash the scallops carefully, removing any grit or goo, but keeping the coral attached if yours came with. Season lightly with salt and pepper on both sides. Chop the chorizo slices into small pieces. Put a splash of vegetable oil in a heavy-based stainless steel frying pan or cast iron skillet, and put over a moderate heat. Toss in the chorizo and allow them to sweat out some of their oil, and fry until golden brown. Remove and set aside. Wash the lettuce leaves and place one on each plate.

Turn the heat up to maximum, and put the scallops in the pan. If you're cooking a large quantity, don't overcrowd the pan, as this will reduce its temperature and cause the scallops to sweat instead of sear. Fry the scallops for one minute and then turn over. The cooked surface should be have a dark golden brown ring on it and be seared shut. Cook on the other side for a further minute, then remove and place on the lettuce leaves on each plate. Scatter with chorizo pieces, splash with 1 tsp of balsamic per plate, and drizzle over your best olive oil.

Wednesday, 9 March 2011

Stuffed Pancakes

It's pancake day, so here comes a pancake recipe! My mum used to make these every few months for us as kids, and we were always really excited whenever she got the pancake pan out. She used to make two different fillings, one with tuna, and one with vegetables and a white sauce, top them with cheese and bake for 20 minutes. After the savouries (1 of each, seconds first for the eldest :) we'd always be looking forward to the sweet dessert pancakes with sugar and lemon. Good times!

This is a little adaptation I tried out tonight, combining the two ideas: tuna with vegetables, and bulked a little with some cannelini beans. If you're vegetarian, you could just omit the tuna. I use a similar technique as when I make chicken enchiladas: cooking the filling in its own juices briefly, then filling the pancakes and topping with a small amount of white sauce to keep them from crisping too much, then of course cheddar cheese. But unlike tortillas, pancakes can't take lots of strong flavours, so I keep this dish interesting with a gentle use of herbs and letting the filling be a little inhomogeneous.

This serves three, a bit of an awkward number, but the SO is heading off later this week and I wanted an extra portion to reheat later! You could always serve four with this amount, and just have some good bread and salad on the side. You'll need a quality, fairly deep oven pan for this, preferably rectangular, and of course a decent pancake pan.

Ingredients:
For the pancakes:
  • 200g plain flour
  • 4 eggs
  • plenty of milk
  • 1 tsp salt
  • 2 tbsp vegetable oil
For the filling:
  • 1 fat leek
  • 3 stems of celery
  • 2 carrots
  • 2 tomatoes
  • pinch of thyme
  • 1-2 tins tuna
  • 1 tin cannelini (or butter) beans
For the white sauce:
  • Knob of butter
  • 2 tbsp plain flour
  • 200ml milk
  • grating of nutmeg
  • 1 bay leaf
  • 1 handful finely chopped parsley

Put the flour in a big bowl and break your eggs in. Whisk them into the flour using a balloon whisk until you have a thick paste with few or no lumps; try not to overmix or the gluten will start going tough. Add milk, a little at a time, and whisk in until your batter has the consistency of thin cream. You can check this by lifting up some of the batter and pouring it with a spoon. It should pour easily, and will be thinner than you expect if you haven't made pancakes before. Whisk in the salt and vegetable oil - the latter will float on the surface but don't worry about it.

Heat the pancake pan to a moderate heat and add enough batter, rotating the pan so it covers it all to make a thin pancake, as large as the width of your oven pan. It's great if you can have someone make all the pancakes while you get on with the filling!

Preheat the oven to 200 C. Slice the leek lengthwise, wash out the dirt from the outer leaves, top and tail and finely chop. Sautee in a little butter over a moderate heat until softened. Meanwhile, dice the celery and carrots, then add and stir in. Dice the tomatoes, then stir them in with the pinch of thyme; cover and allow to cook through for five minutes. The carrots should be just done. Drain your tins; wash the beans (I hate that gloopy weird stuff they float in!); and add the contents to the pan. Break up the tuna into large-ish chunks. Don't be tempted to stir it all in, just combine gently. Cover and allow to heat through for a few minutes.

Meanwhile, make the white sauce. Personally I always do this in the microwave: 20 seconds for the butter, stir in the flour, then add the milk a very little at a time, stirring thoroughly between each addition. Add the nutmeg, bay leaf, and a little seasoning, then microwave for 2 minutes. Stir thoroughly again, especially paying attention the the bottom and sides of the jug, then microwave again for a further minute. Add the parsley, stir and leave to the side. This is not an especially thick white sauce: you can make a thicker one by upping the proportion of flour and cooking for longer.

When all your components are ready, lay a pancake in your oven dish and 1/nth of your filling, where you have n pancakes. Roll it up, and repeat until all your pancakes are filled and nestled in the dish. Pour over the white sauce and top with grated cheddar cheese. Bake for 20 minutes, until golden brown on top. Delicious, unchallenging comfort food.

Monday, 7 March 2011

Gumbo

Ah, gumbo. The taste of Louisiana, so I'm told. This is a rich stew, perfect for cold evenings and a glass (or two) of full-bodied red wine. I like to use chicken, sweet chipolatas from the local butcher, and a very few fresh, raw tiger prawns from the fishmonger. But you could vary this depending on what you have to hand: pork fillet, turkey, even steak would be perfectly acceptable instead of chicken, and some fine smoked fish or scallops would be delicious instead of prawns.

I usually serve this with plain brown rice, but crusty bread or roasted sweet potatoes would also work. This is a good meal to cook for friends as it is fine reheated- just don't add the tiger prawns until you're about to serve. I tend to make it on a Sunday for just the two of us, then keep another two portions for later in the week.

Ingredients:

  • 4 (or more if your budget stretches) raw, shell-on, tiger prawns
  • 2 large or 4 small chicken thighs
  • 6 long, high-quality chipolatas
  • 1 red onion
  • 1 white onion
  • 1-2 green peppers
  • 4 fat cloves of garlic
  • 1 sweet red chilli (or 2-3 if you like it HOT)
  • 3 stems celery
  • 4 tbsp plain flour
  • half a small glass of red wine
  • 2 tins good-quality chopped tomatoes
  • 250g okra
  • 2 tsp cumin seeds, lightly pounded in a mortar and pestle
  • 2 tbsp paprika
  • 2 bay leaves

Shell the tiger prawns, and make a quick stock out of their heads and shells, the onion heads and tails, one of the stems of celery and 100ml of water. You can leave this bubbling while cooking the rest of the ingredients.

Add a tbsp of vegetable oil to the bottom of a deep cast-iron pot (Le Creuset is perfect here!), set it over a low heat and finely chop the red and white onions. Gently fry these for ten minutes until translucent. Meanwhile, chop the green pepper and celery into small pieces, and very finely chop the red chilli. Add these and crush the garlic into the onions. Stir and cook for three minutes, until the chilli and garlic have softened. Remove the vegetables from the pan.

Cut the chipolatas into thirds. If there is no oil left in the pan, add a mere drop, and then add in the chicken thighs and the chipolata pieces. Sear them on each side for a few minutes, until the skins are sealed and golden. Add the flour to the oil that will have accumulated from the sausage fat - if there is not at least 1 tbsp in the pan, add a little more. Cook the flour until it has changed to the colour of peanut butter: this is the roux, and it will thicken the stew and add a smoky flavour. Meanwhile, slice the okra diagonally, to make pretty parallelogram pieces.

Splash in the red wine to deglaze (one for you, one for the pan), then return the vegetables and add the two tins of tomatoes, okra, cumin, paprika and bay leaves. Strain your prawn shell stock into the pan. Combine gently, then cook covered for 25 minutes, stirring occasionally so that the mixture does not stick to the bottom. Taste and season, then add the raw tiger prawns to the surface, pushing them just under the liquid. Cover and cook for four more minutes: the prawns should curl up and go pink. Serve with brown rice, or sweet potatoes, or just a dollop of creme fraiche. Top with fresh chives or coriander if desired. Must be eaten with the rest of the red wine, or an ice-cold (lager) beer.

Saturday, 5 March 2011

Sausages with Apple Rings

This is my auto-pilot way of cooking sausages. I often leave them til later in the week, and I like to make sure they're cooked completely through if they've been in the fridge for a few days. Braising ensures they're piping hot throughout, and gives a delicious gravy, which is perfect with fluffy mashed potato & parsnip, and some greens like brocolli, cabbage or peas. With accompaniments, this serves two people who love apple rings!

Ingredients:

  • 4-6 high-quality sausages
  • 2 small onions
  • 2 small eating apples
  • 1 tbsp plain flour
  • 250ml nice cider
  • 1 tbsp or capful of cider vinegar

Fry the sausages over a medium heat in a deep frying pan. Don't worry if they explode a bit, or stick to the pan: those nubbly sticky bits will be delicious later. Brown the sausages on all sides, making sure the skin goes from stretchy pink to golden brown. Meanwhile, peel and slice the onions into fine rings (about 1-2mm across). Remove the sausages from the pan, and add the onions, and a little oil if needed. Scrape the nice sticky bits off the bottom as you go. Fry the onions until well-cooked, about 10 minutes, turning occasionally so they don't stick to the pan. Meanwhile, core the apples and slice into thick rings (about six rings per apple, then they tesselate nicely in the pan!). Remove the onions and replace with the apples, frying for two minutes on each side until golden brown. Remove when done.

Now return the onions and sausages to then pan, and add the flour on top, stirring it in to coat the onions. Then pour in the cider and cider vinegar, deglazing any last caramelisation from the bottom of the pan. Cover and cook on a low heat for 15 minutes. (Now is a good time to set your potatoes and greens going.) Then add the apples back to the pan, cover and cook for another five minutes. Season with black pepper and enjoy!

Friday, 4 March 2011

Carrot & Courgette Fritters

These make the ultimate TV snack dinner, and are surprisingly quick and fun to make. You can vary the contents depending on what you have to hand, but I find a base of carrots and courgettes is a good flavour and texture combination to start with, and hold together well while cooking. Sweet chilli sauce and some good TV or a movie are a must! We're currently watching the third season of Breaking Bad, and it's utterly brilliant.

I've served these with a variety of accompaniments: ideally you want something fairly plain that you can eat with your hands. I've usually ended up serving with plain short-grain brown rice, which wins on the former but not the latter. If you wanted something a little more healthy then a sharply-dressed salad would contrast nicely against the crispy fried fritters. The recipe here is enough for two and can be prepared in half an hour; since the cooking is a little human-intensive, you'll need to scale the cooking time if you're preparing these for more people.

Ingredients:

  • 2 fat courgettes
  • 3 large carrots
  • 2-3 spring onions
  • a small handful of fresh mint or fresh coriander
  • a big piece of ginger
  • 2 tsp ground coriander
  • 3 tbsp plain flour
  • 1 egg, lightly beaten

Finely chop the spring onions and herbs, and scrub or peel the carrots. Peel back about an inch of the skin from the large piece of ginger. Grate it coarsely up to the limit of the skin (you can then cut off and discard the stringy bits). Grate the carrots and courgettes in the same grater: they'll push through the nice gingery juice you might lose if you left the ginger til last. Put all the gratings in a very large bowl and sprinkle over the coriander, flour and egg. Using a spoon or your hands, combine all the ingredients into a squishy mess.

Set 1-2 frying pans over a moderate heat with a few tbsp of vegetable oil in each: more pans = a faster turnover, but more chaos! Taking a few tbsp of battered vegetables at a time, place them into the hot oil and pat flat with a spatula. Fry for two minutes on each side, or until golden brown on each side. They don't keep long, so serve immediately with sweet chilli sauce!

Savoury Pumpkin Pie

Another crafty use of pumpkin! Still munching our way through the Crown Prince: this recipe used about half of the 4kg monster. Once again, delicious sweet flesh with body and flavour: it really works well here as it's meltingly soft against the crisp buttery pastry. The only sad thing about this pumpkin is that the seeds are so enormous, they don't roast well in the oven to give a good snack.

Anyway, this recipe works well for six people as the carbohydrate portion of a main meal, or as lunch on its own. It would be brilliant to make a few as part of a large buffet. In my opinion it should always be served warm. It keeps well, but the pastry may become soggy if reheated in the microwave, so be prepared to use the oven if you want to recover the freshly-cooked crispness. Also bear in mind this takes 1.5-2 hours from start to finish, as there is a lot of cooking time.

Ingredients:

  • 1.3-1.5kg of peeled and deseeded pumpkin (budget 1.8-2kg of raw pumpkin)
  • vegetable oil
  • cinnamon
  • 375g puff pastry
  • 1 egg, lightly beaten, for brushing
Preheat the oven to 200 C. Cut the pumpkin into small cubes and steam for 15 minutes, until tender. Tip the pieces into a roasting tin, add a generous pinch of cinnamon and a few tbsp of vegetable oil, season well and toss to coat. Roast for 45 minutes without turning: the edges will crisp and go lightly golden. When cooked, crush the pumpkin into a coarse mash.

Cut the pastry in half, and roll each piece out to fit a baking sheet. Place a sheet of greaseproof paper on the tray, then a layer of pastry, and spread out the filling over the top. Brush the edges of the pastry with the beaten egg, lay the other layer over the top and crimp the edges together. Using a sharp knife, make two or three slits on the top, so that the steam can escape as the pie cooks. Brush the pastry over with the remainder of the egg and bake for 25 minutes. Nigel Slater's original recipe calls for you to wait for 5-10 minutes for the pie to settle before cutting, but you will find that very difficult :)

Thursday, 3 March 2011

Gnocchi with Tomato & Mozzarella Sauce

This is a quick one for when you're in a hurry. We needed to put something together before picking up some friends and driving out to a board games evening - Snatch, Hacienda, Through the Desert, and Web of Power, if you were wondering! I had some tomato juice left over from the laksah, a couple bunches of spinach and a ball of mozzarella I hadn't been able to resist buying at the weekend. So! Instant Italian-style supper for two.

Ingredients:

  • 3 large shallots or a medium white onion, peeled and finely chopped
  • 2 cloves of garlic, peeled
  • 4-5 large fresh tomatoes or a 400ml tin, diced
  • two bunches or a bag of spinach
  • a large ball of mozzarella
  • half a bunch of basil
  • fresh gnocchi, or pasta of your choice

In a deep frying pan (not necessarily non-stick), gently fry the onion or shallots in a little olive oil, until golden. Crush the garlic into the pan and cook for a further minute. Add your tomatoes and stir together, then bring to a simmer - you can cover the pan to bring it to temperature faster. Simmer uncovered until the tomatoes lose their shape and the sauce just transitions from liquid to paste-like. This is why I use a frying pan: the water evaporates faster from the larger surface area.

Meanwhile, rinse the spinach, and place it in a deep saucepan. Cover and place over a moderate heat, stirring after two minutes so the spinach doesn't stick. Allow it to steam in its own water and remove as soon as it has collapsed. You can reuse the pan to cook your pasta according to its instructions (gnocchi are done when they float to the top like cheerful clouds). Leave the spinach to drain, then squeeze out the liquid when it has cooled, and roughly chop, adding half a teaspoon of salt as you do. Tear or slice the mozzarella into bite-size pieces.

When it is cooked to your liking, drain the pasta. Remove the tomato sauce from the heat and tip in the mozzarella and spinach. Stir gently through, season with black pepper, and leave off the heat, covered, for two minutes. Serve your pasta in shallow bowls and tip the sauce over: the mozzarella will have softened and become a tiny bit molten, and the flavours will have mellowed together.

Wednesday, 2 March 2011

Smoked Mackerel Chowder

Mmmmmmmm, I love chowder! It took a long time for me to pluck up the courage to try making it, as I'd had so many good versions in restaurants and it always looked like it would be complicated, with a strong potential for ruining lots of nice seafood. The best way to start making chowder is to use a strongly-flavoured and robust fish, without messing around with different shellfish and getting all the cooking times correct.

On Saturdays there is a fishmonger in Cambridge market, and he sells an excellent range of fresh and smoked fish. We love the whole smoked mackerel, which work perfectly in this recipe - or just flaked on toast, or a baked potato. If you can't locate good smoked mackerel, you can try the vacuum-sealed fillets available from supermarkets, but they'll lack the creamy tenderness of properly smoked fish.

Ingredients:

  • 1 whole smoked mackerel or a packet of vacuum-sealed mackerel fillets
  • 1 peeled onion or well-washed leek
  • 1 large or 2 small potatoes
  • 2 carrots
  • 3 sticks of celery
  • large handful of parsley
  • a few bay leaves
  • 500ml vegetable or fish stock
  • 1 small tin of sweetcorn
  • 100ml cream

Strip the skin and bones from the whole mackerel, and flake the flesh into large pieces, discarding bones as you go. You can make a very strongly-flavoured stock from the skin and bones, if you have time: just boil them in a saucepan for 10 minutes. Finely chop the onion or leek and fry in a deep pan at a low heat, until it begins to go translucent. Cube the potatoes and carrots, and dice the celery and parsley. Add the vegetables and a few bay leaves to the pan, and fry with the onions for a few minutes, scooping from the bottom so they don't stick.

Add the stock and season with pepper. Don't be tempted to add salt just yet, as smoked fish is often salty itself. Cook until the vegetables are just tender - about 10 minutes. Gently combine in the flaked mackerel, drained tin of sweetcorn and the cream. You can use double cream if you're feeling luxurious, single for a tasty midweek supper, or even reduced-fat creme fraiche if you're watching the calories. Cover for a minute or two, allowing the chowder to reheat, and remove from the heat just as it comes to a simmer. Taste for seasoning; it may need a little salt at this point. Serve with crusty bread to mop up the juices.

Pumpkin Scone

I've been eating this for lunch for a couple of days, and every time my colleagues see it they ask what it is, and how I make it! It's a great replacement for bread if you're bored of sandwiches, and serves well alongside a few slices of sharp cheddar or soft goat's cheese. You could also slice it into small pieces, top with goats cheese and a few snippets of chive, and use as a vegetarian starter.

Again it's an adaptation of a Nigel Slater recipe; this time I've changed the cooking method as I don't own a shallow oven-proof pan. We're still working our way through the Crown Prince and it's the perfect ingredient here. However I think you could comfortably substitute sweet potato; perhaps use a little less milk to adjust for its higher water content.

Ingredients:
  • 300g peeled and de-seeded pumpkin
  • 140g plain flour
  • 1/2 tsp baking soda
  • 1/2 tsp salt
  • 70g butter
  • 1 egg
  • 90 ml warm milk
  • 2 tsp thyme leaves
Cut the pumpkin into ~3cm chunks and steam for 20 minutes, or until tender enough to mash. Whiz the flour, baking soda, salt and butter together in a food processor. Drain the pumpkin and mash with a fork or potato masher, and beat in the egg, milk and thyme leaves. Season with black pepper. Combine the pumpkin and flour mixtures gently, stirring until no more flour is visible, but no further.

Warm a non-stick frying pan with a little vegetable oil to a low to medium heat. When the oil is warm, tip the dough in, scraping out the bowl and flattening the top. It takes patience at this point, as the cool dough will reduce the temperature of the pan, but don't be tempted to turn the heat up. Instead, cook for about ten minutes, and in the meantime preheat the grill to medium. You'll see the edges of the scone start to vent steam; at this point lift the edge of the scone gently and check the underside; it should be golden-brown.

Put the whole pan a few inches underneath the grill to finish off; the top should have a thin, golden-brown crust. If you know your grill well, you can grill it on medium for five minutes, then switch it off and leave it took cook in the residual heat. Serve warm, especially with cheese. It keeps for a few days, covered, in a cool place rather than the fridge.